Pour over brewing is one of the purest ways of making black coffee. It doesn’t need any milk or cream, and its brewing method is so brilliantly simple that anyone can master it after a few tries.
While I do love brewing methods of all kinds, I don’t think any of them get me as excited as pour over drip filter coffee. It’s a brewing method that gives you a lot of flexibility with the type of beans you use and the level of strength that you want to apply. Personally I think it give you the greatest sense of a bean’s flavor profile, offering the best representation of coffee as its core.
It can seem a bit daunting to newcomers to get right however. From getting the appropriate grind size to the precise water temperature you need, there are a lot of variables that need perfecting.
Never fear though: Here’s my step-by-step guide to brewing the perfect pour over coffee.
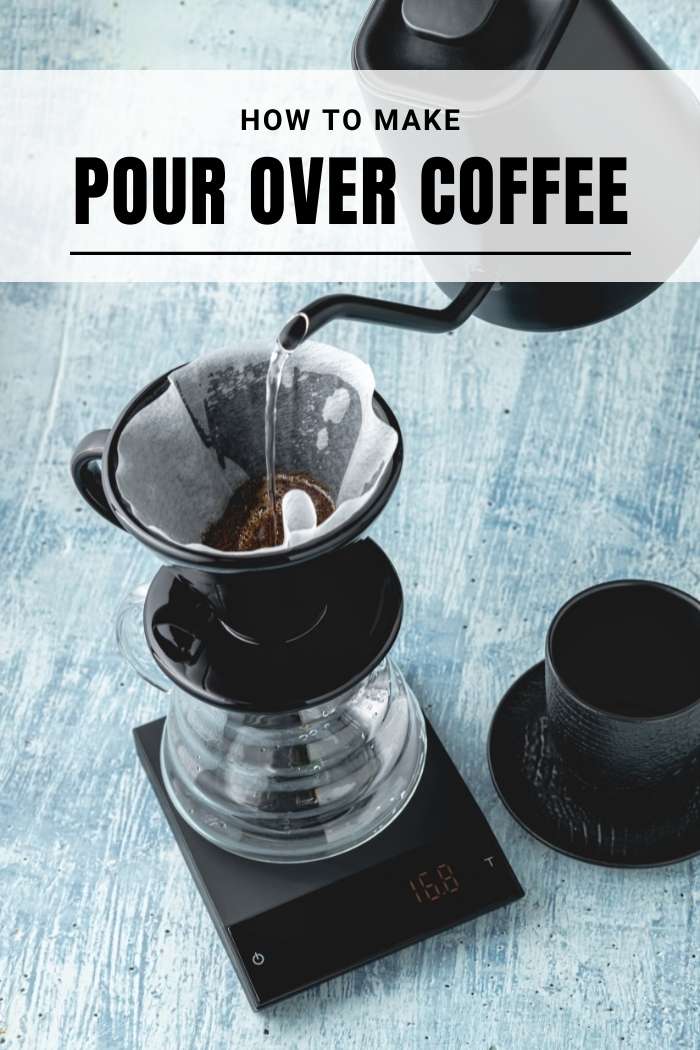
#1. Get the right gear
Just like with any brewing method, pour over requires a few specific items that are unique to it. The main piece of apparatus you will need is a V60 dripper, as well as the carafe and filter paper that go with it. Filter paper can vary in size, so make sure that you get one specific to V60.
Here are some handy Amazon links to help you get the right bits:
Also, I can’t stress enough the importance of a burr grinder. I have a lot of time for blade grinders, but in the case of drip filter it’s just so important that you get the grind size right. Blade grinders tend to produce inconsistent grounds, which is the complete opposite of what we need for pour over.
So, nothing besides burr will do. Good news though: They’re not as expensive as you might think, and are absolutely worth the investment.
I’ll leave coffee bean choice up to you. I often prefer a medium-dark roast, but light roasts work equally well. The full list of what you need is below.
You will need:
- Coffee beans of your choice
- Coffee scales
- Burr coffee grinder
- V60 dripper
- V60 filter paper
- Carafe/Coffee server
- A water thermometer
- A small teaspoon or stirrer
- Freshly boiled water
#2. Measure it out
Just like with cooking, the recipe and measurements you use to brew coffee are crucial. It’s really important to be consistent with every cup that you make, which will ensure you brew a good coffee every time you come to make it.
Having a digital scale will help you keep this consistency. It will help you measure out exactly the amount of coffee and water you need. This will make sure that you not only have enough coffee for your serving, but also that your ratios are precise.
For the purposes of this recipe, we want to use 30 grams of coffee, which translates to about one ounce. Use the scales to measure out this amount and then put them in your grinder.
#3. Grind it
Now it’s time for the fun part.
Like I said above, I would always recommend getting a burr grinder regardless of whichever brewing method you opt for, but I feel it’s especially important to recommend it for pour over.
For drip filter methods like this it’s really key to strike the right balance between coarse and fine grounds. You need an exact consistency, which is hard to achieve with a regular blade or manual grinder.
Set you burr grinder to medium and grind until all your beans have been processed.
Pro tip: I like my filter coffee a little bit on the strong side, so to dial my grind settings just one notch from medium towards fine. Be careful not to go any further than this though, otherwise you’ll risk getting really bitter results.
At this stage it’s important to note that you should only grind the amount of coffee that you intend to use. Coffee starts to oxidize as soon as you grind it, making it start to lose its beautiful aromas and flavors almost instantly. If you keep any unwanted grounds as leftovers for your next cup, its overall quality will suffer. For a similar reason, I always recommend against using pre-ground coffee.
In short, keep it fresh and grind your beans at home.
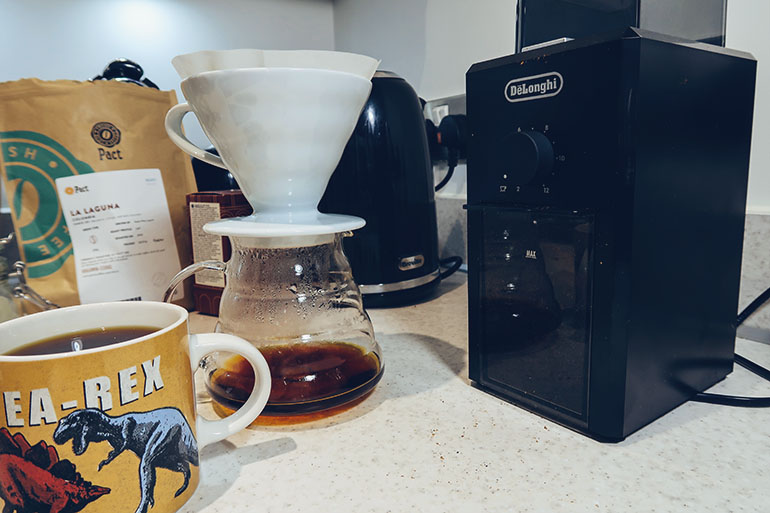
#4. Set up your filter
Set up your filter gear by placing the dripper on top of the carafe, and then line the paper inside the dripper. The Haro V60 is one of my favorite bits of coffee gear I own, and if you don’t have one already then I urge you to get one.
There are a lot of things I love about it, but the paper filters in particular help contribute to a really clean, pure cup of coffee. Unfortunately you don’t always get this with other brewing methods. Pour over really brings out the acidity and flavors of the coffee without being overpowering.
Before we go ahead pouring in our coffee we have one crucial step: We need to pre-wet your filter paper.
I know that wetting a bit of paper might seem insignificant, but what this step does is wash out some of the dust or ‘paperiness’ of the filter before we use it for brewing. Bleached filter papers in particularly can retain a bit of an artificial or synthetic taste, so pre-wetting the paper helps remove some of that.
If you’re sceptical about this then check out Scott Rao’s piece on pre-wetting here.
Pre-wetting is really easy to do. Simply line the inside of your Haro V60 coffee filter with your paper and then pour a little bit of your heated water on top of it.
Not only does this step help cleanse the filter paper, but it also warms your dripper and carafe. This can help give you a more consistent temperature throughout brewing. Remember when I said that consistency was key to a good cup of coffee? Seriously, it is.
Once you have rinsed the filter, pour away any water that’s gathered either in your dripper or in your carafe. Reset the dripper on top of the carafe and we’re almost good to go.
#5. Water temperature
Water temperature is also key to good drip filter brewing. Too hot and it’ll overextract your coffee, leading it to taste bitter and burned. Too cold and it’ll underextract, tasting weak and sour.
Don’t pour your water in as soon as it has boiled. Instead, wait for it to cool slightly to your target temperature.
Your target temperature will largely depend on what roast of beans you’re using. If you are using a dark roast you need to aim for a water temperature of between 185 and 192 degrees Fahrenheit (85 to 89 degrees Celsius). Darker roasts are slightly more bitter in flavor, so it’s important that we work with a slightly lower water temperature to try and balance out the coffee’s rate of extraction.
If you are using a medium or light roast try to aim for between 197 and 203 degrees Farenheit (92 and 95 degrees Celsius). A higher water temperatre will increase the rate of extraction to help balance out the more subtle tones of the lighter roast.
Now you’re finally ready to pour.
#6. Get blooming
Add your freshly ground coffee to the filter. Give it a light couple of taps on the side to level out and settle the top surface of the coffee bed.
We then want to do something called blooming. This involves adding a small amount of water to the coffee bed to pre-wet them. This serves two purposes:
- It starts the release of carbon dioxide from the coffee bed. It’s important to let your grounds do this before adding any more water. If we have too much CO2 still trapped in the particles it will obstruct the water flow, which will then interrupt our extraction and not allow the full release of the coffee’s aromas and flavors.
- The wet bed of grounds will help the remainder of our water move more freely, providing a much more efficient level of extraction.
I’ve seen some people say that for the bloom you need to add twice as much water as you have coffee. Personally, I just add enough to ensure that I have pre-wet the top layer of grounds. I then leave them to bloom for just 30 seconds before starting to add the remainder of the water.
#7. Pour the water
Once this 30 seconds is up, it’s time to add the rest of your water. It’s important to do this slowly, smoothly, and evenly.
Do all of this with the carafe resting on your scales so that you can accurately measure the amount of water being added to your brew. The general consensus for water-to-coffee ratios is 16:1, although if you like it a touch stronger than there’s no harm in 15:1.
Use this brilliant brew ratio calculator to find the right ratio for you.
Assuming a 16:1 ratio with 30g of coffee we then want to use 480g of water. Slowly pour on the first 150g, trying to cover all of the grounds in the center and around the edges of your coffee bed.
Once you have added that first 150g, add the remaining amount of water. Do this by pouring it slowly in the center of your coffee bed.
The trick here is to try to pour it in at the exact same rate that it’s exiting the dripper on the other end. The theory is that this should keep the temperature in your coffee slurry relatively stable throughout the process, ensuring that you are extracting as much of the sweetness and body out of the beans as possible. If you keep pausing then pouring, the temperature will fluctuate and lead to an uneven extraction. Did I mention that consistency is key?
Once you hit 480g water then stop pouring. Use a small teaspoon or stirrer to stir the slurry just two or three times. This helps create something called agitation, which creates a bit of turbulence in the slurry. This helps increase extraction to combat the loss of temperature that we experience towards the end of filtering. Wait for the last of your coffee water to filter through and then you’re done.
Ideally this pouring process should take somewhere between two-and-a-half and three minutes. If it takes longer your coffee might be overextracted and therefore overly bitter, in which case next time try to use slightly more coarse grounds.
Over to you…
This method I use has stood me well over the years, but I know that everyone has their own approaches and tweaks that like to deploy. How do you make your pour over coffee? Let me know in the comments below!